
A well-organized blog is the backbone of a successful online presence. Blog organization refers to how well your website’s content is organized and sorted. A well-organized blog improves user experience by making it simpler for readers to access relevant information. Effective organization also has a big impact on SEO because it makes it easier for search engines to index and rank your content.
WordPress’s categories and tags improve your blog by offering efficient content categorization. Categories provide broad organization for topics, whereas tags provide specific identification. Together, they boost user navigation, content discoverability, and SEO, resulting in a more interesting and well-organized blog for your readers.
Table of Contents
What Are Categories in WordPress?
WordPress categories are a basic organizational tool that allows you to group and categorize your blog entries into more subjects or themes. They are an important component of the WordPress taxonomy system and are essential for enhancing your website’s organization, accessibility, and user experience.
The main function of categories is to organize and classify the content of your blog. They help you in presenting your posts a hierarchical structure that makes it simpler for readers and search engines to understand the content’s relevance and context.
Organizing your content hierarchy
WordPress’s hierarchical category structure is created by grouping your categories into parent and child categories to create a tree-like structure. This hierarchy provides an organized way to organize your content, with parent categories representing broad topics and child categories getting deeper into specific subtopics. For example, if you have a travel blog, you can create parent categories for continents (such as Europe, Asia, and North America) and then child categories or posts for specific countries or cities inside each continent. This hierarchy is a helpful technique for helping categorize and classify your content.
By categorizing related topics into parent and child categories, you can create a clear and organized the framework for your blog. This makes it simpler for you and your visitors to figure out how various topics are related to one another and grouped. Hierarchical categories improve the user experience by allowing users to navigate your website in a more simple manner.
Users can easily recognize the primary topics and subtopics addressed on your website when they see a well-structured menu or category list with parent and child categories. This makes content discovery more effective.
How to create Categories in WordPress
It’s easy to organize your blog content effectively with WordPress by creating categories. The following is a detailed step-by-step guide:
- Access the Posts Section : After logging in, you’ll be directed to the WordPress dashboard. Find and select “Posts” in the left sidebar. The Posts menu will be expanded. Next, select “Categories.”
- Add a New Category : On the Categories page, there is a form for creating a new category. It usually contains the following fields:
- Name: Enter the name of the new category in the “Name” field. Select a descriptive name that describes the content that will be classified under this category. For example, if your site is about cooking, you could make a category named “Desserts.”
- Slug: The “Slug” is the URL-friendly form of your category name. WordPress will create a slug based on the name you entered automatically, but you can modify it if necessary. Only lowercase letters, hyphens, and no spaces are permitted in slugs.
- Parent Category (Optional): You can specify a “Parent” category to create a hierarchical structure for your categories. This is helpful when a larger category contains subtopics. For example, “Desserts” may be a subcategory of “Recipes.”
- Description (Optional): In the “Description” area, you can provide a brief description of the category. It’s optional, however it can help users in understanding the category’s content.
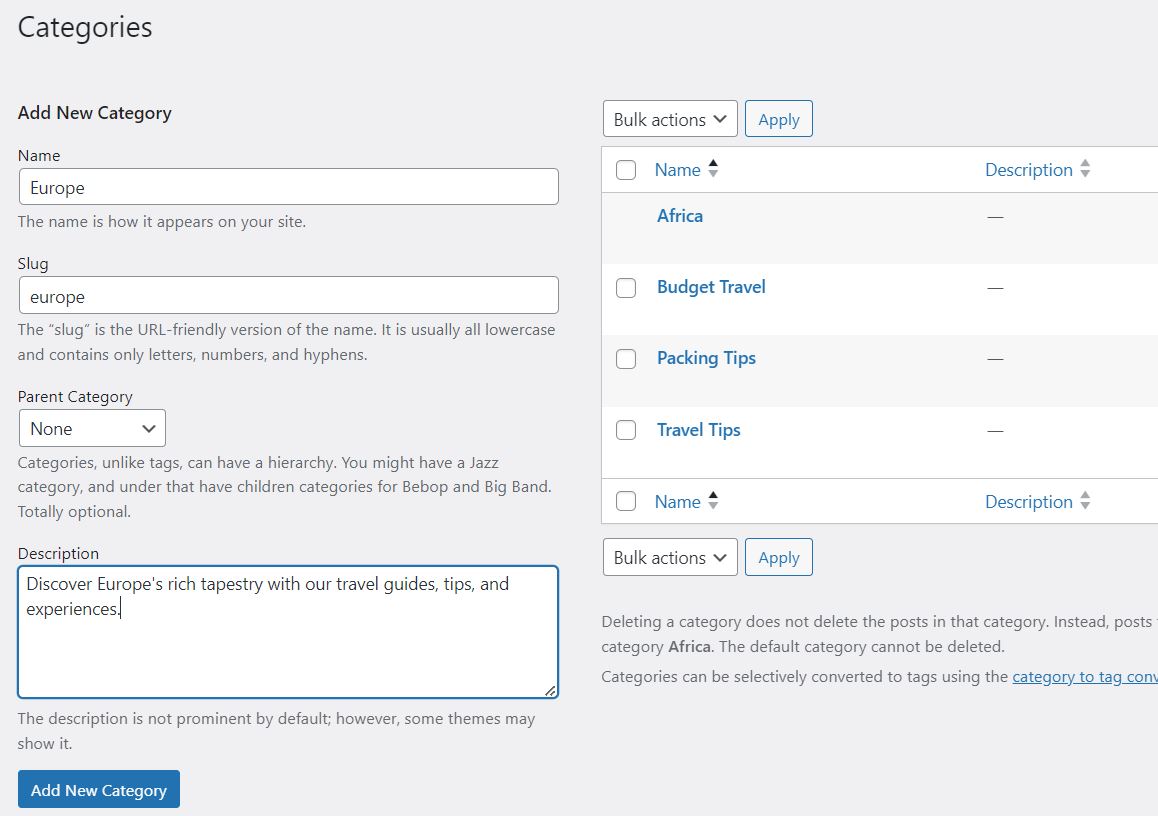
- Click “Add New Category”: Click the “Add New Category” button once you’ve finished entering the details for your new category. Your new category will be created and shown on the right side of the Categories page.
- Assign Categories to Posts: You can edit each blog post separately to add your newly formed category to it. Here’s how:
- Create a new post or edit an existing one.
- The “Categories” meta box is found on the right sidebar (or under the “Document” tab in the block editor).
- Select the category you want to give the post by checking the box next to it.
- Check all the applicable category boxes if you wish to add the post to more than one category.
- To save your changes, click the “Update” or “Publish” button

That’s all! You’ve successfully added a new category to your blog post or posts in WordPress. The use of categories will help you organize the content and improve reader accessibility.
Using Categories for Site Navigation
Your website visitors will find and access certain content more simply if you use categories for site navigation. They are frequently shown in menus or sidebars, where visitors may click on a category to view all posts relating to that topic.
- How Categories Appear in Menus:
WordPress allows you to include categories in the navigation menus of your website. This feature allows users to easily navigate your site using the categories you’ve set to your blog posts. How to use categories in menus is as follows:- Add Categories to the Menu :
You can add a category as a menu item in WordPress. Go to “Appearance” > “Menus” on your WordPress dashboard to add categories to your website’s menu. On the left side of the Menu Editor, you’ll notice a panel with several settings. If it’s not immediately available, look for the “Categories” tab or “Custom Links” option.
On the left side of the Menu Editor, you’ll notice a panel with several settings. If it’s not immediately available, look for the “Categories” tab or “Custom Links” option. You can see a list of all your categories under the “Categories” tab. To add a category to your menu, check the box next to it and then click the “Add to Menu” option.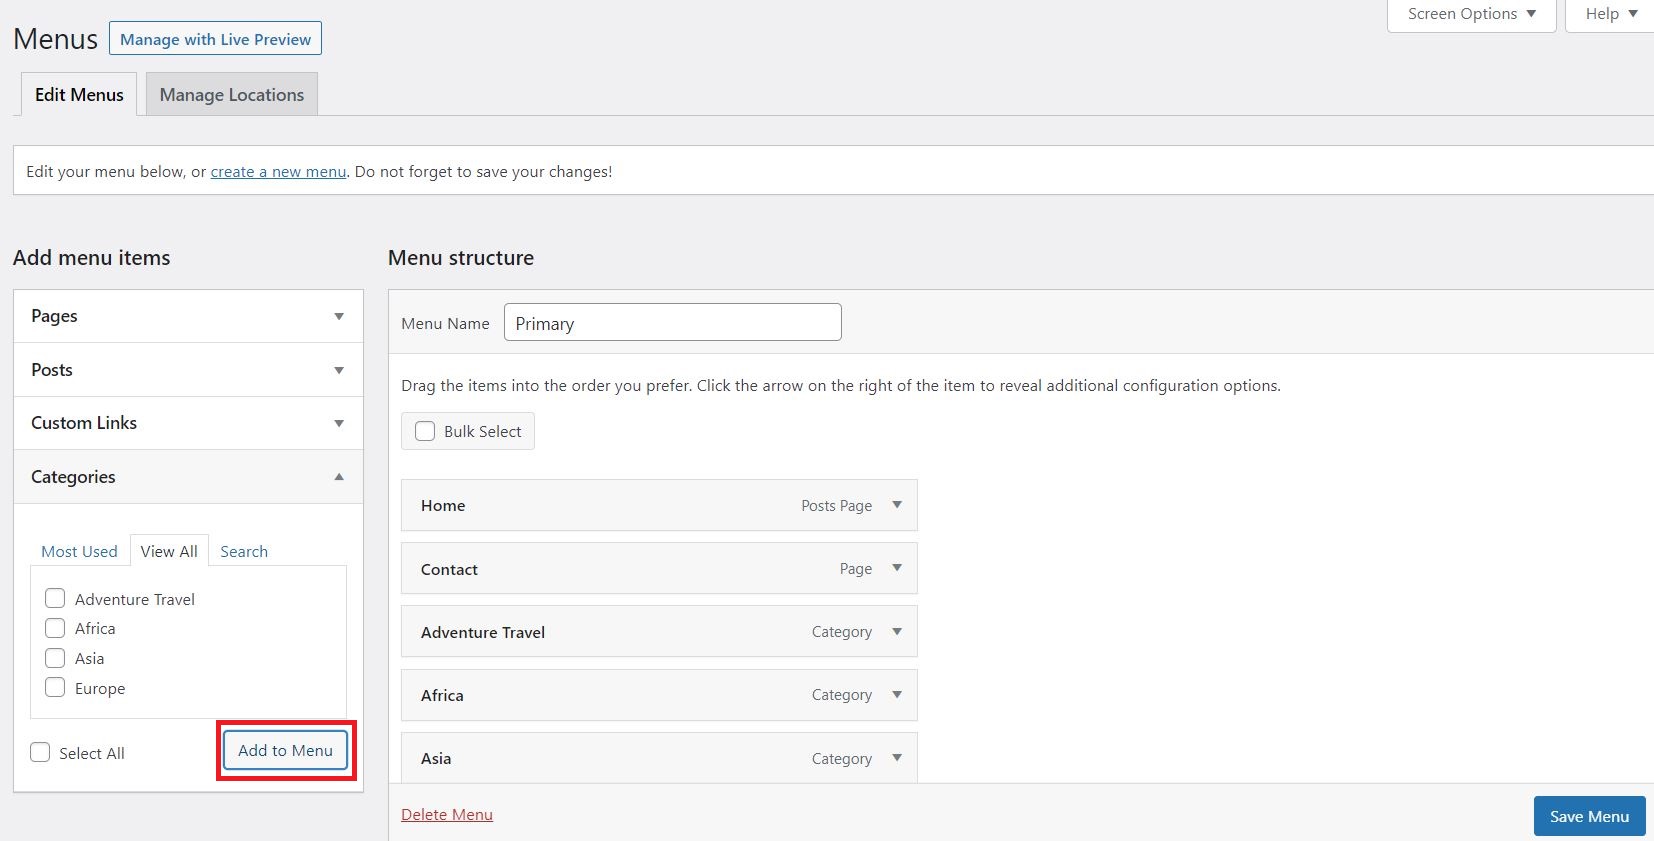
You can now drag and drop the menu categories into the appropriate order. Dropdown menus in your navigation can be used to display subcategories. It is possible to navigate more efficiently if your categories are grouped hierarchically with parent and child categories.
You can change how categories appear in your menus. This includes rearranging the order of categories, renaming them for the menu (if necessary), and modifying their appearance according to the design of your website.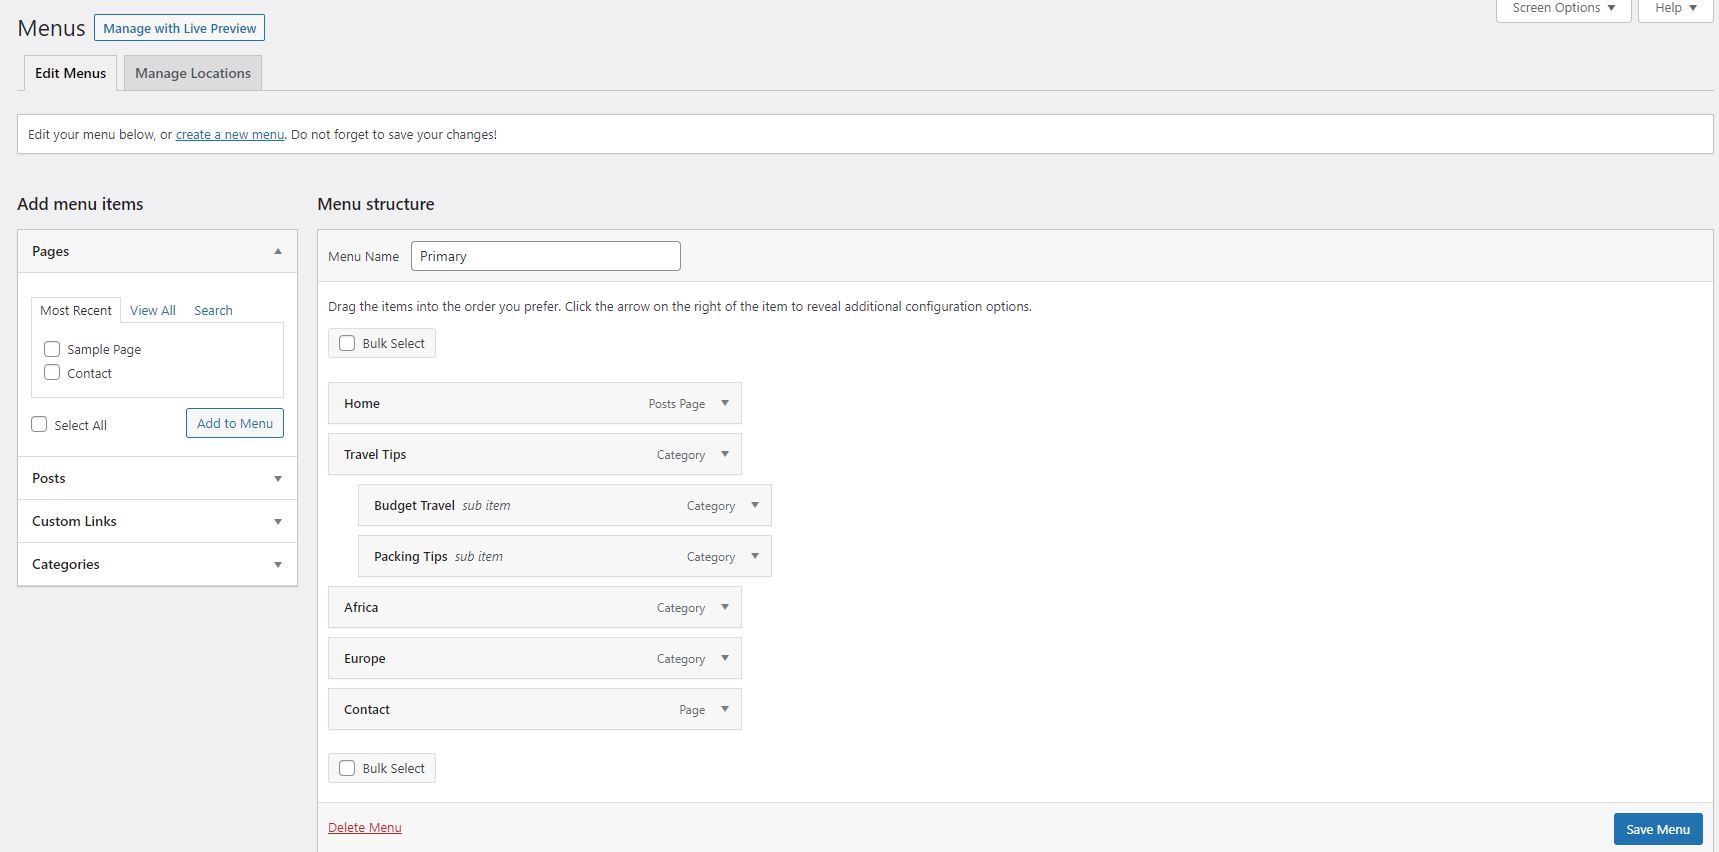
Depending on your theme, you may have multiple menu positions (e.g., primary menu, footer menu). To display your category menu on your website, select the proper menu location.
- Add Categories to the Menu :
What Are Tags in WordPress?
WordPress uses tags to organize and categorize content. They are an essential component of the content management system (CMS) and are used to make it easier for users and search engines to find and navigate within your website’s content.
Tags are keywords or phrases that you add to your WordPress posts and pages to characterize the content or topic matter. They are similar to labels or metadata in that they provide more context to your content. Like categories (an additional way to organize content in WordPress), tags are not hierarchical, meaning they do not have a parent-child connection. They can be freely assigned to your content and are independent.
Purpose of Tags
- Content Organization: Tags assist you in organizing content by establishing a taxonomy based on keywords or topics. Tags provide more specific and detailed categorization than categories, which are often used for high-level content organization. This makes it simpler for users to find relevant topics or articles on your website.
- Improved Navigation: WordPress creates tag archives—pages that provide a list of all posts with a certain tag—automatically when you add tags to your posts. Users can view all the related content by clicking on a tag.
- SEO Benefits: Tags can help with SEO if they are used wisely. When you give relevant and well-chosen tags to your posts, search engines are able to understand the content and context of your posts. This can result in improved search engine ranks for those specific keywords, potentially enhancing the visibility of your blog in search results.
How to Add Tags in WordPress
Adding tags to your posts is a standard practise on many websites and platforms, particularly blogs and content management systems like WordPress. Tags help in the organisation and categorization of your content, making it easier for visitors to locate similar posts. Here is a step-by-step tutorial on how to add tags to your posts:
- Log In: Log in to your blog or website first. To edit or publish posts, you must have the necessary permissions.
- Access the Post Editor: After logging in, you’ll navigate to the WordPress dashboard. Hover your cursor over the “Posts” item in the left-hand menu. This will display a submenu.
- Click on “Tags” : Select “Tags” from the submenu under “Posts” This will take you to the Tags management page.
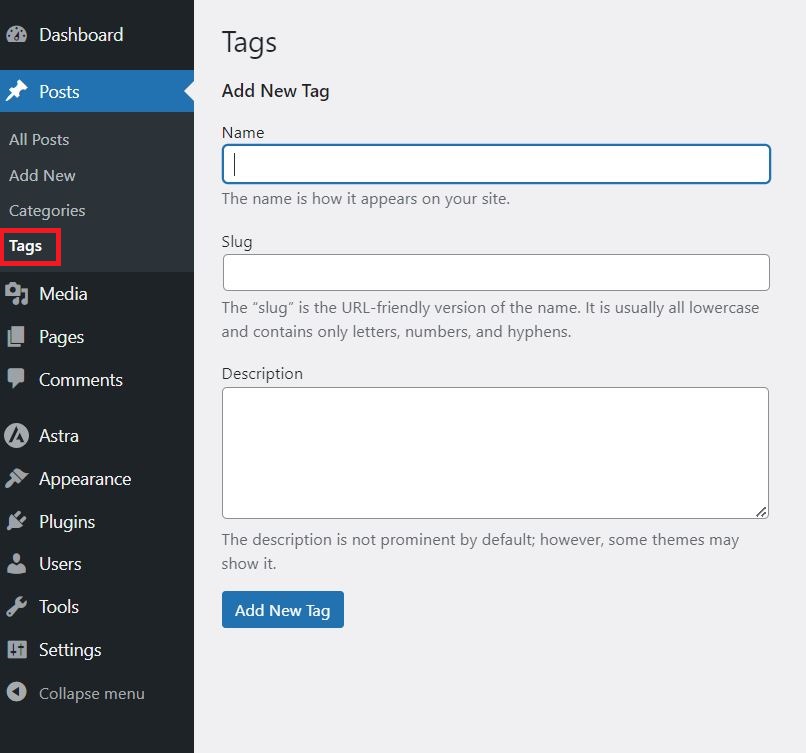
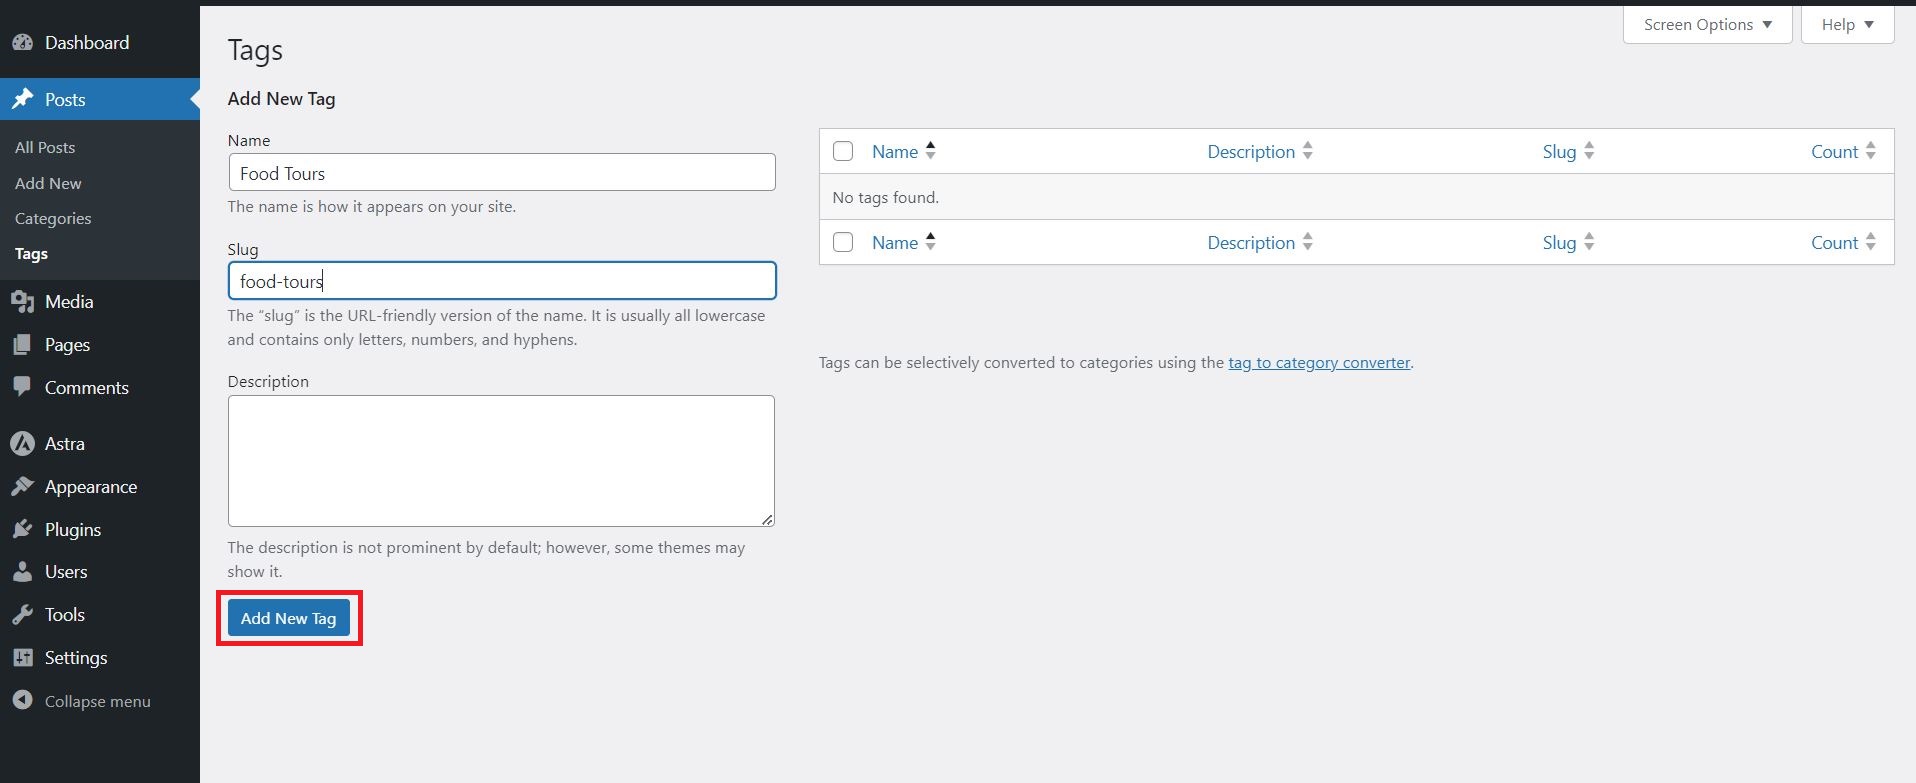
- Create a New Tag: On the Tags page, there should be a “Name” input area that you may use to enter a new tag. In the “Name” area, type the name of your new tag. Make sure it relates to the content you want to tag.
- Add a Slug (Optional): The “Slug” field, which is optional, is located below the “Name” field. The tag’s name is converted into a URL-friendly form via the slug. Normally, WordPress creates a slug based on the name, but you can change it if necessary.
- Add a Description (Optional): A “Description” field is also present below the “Slug” field, although it is optional. Here, you can briefly explain the tag’s purpose or usage. This can be useful for internal reference.
- Click “Add New Tag”: Click the “Add New Tag” button once you’ve entered all the details for your new tag. The list of tags on your website will be updated with the creation of your new tag.
- Edit or Delete Tags (Optional): You can edit or remove tags from the Tags page if necessary.
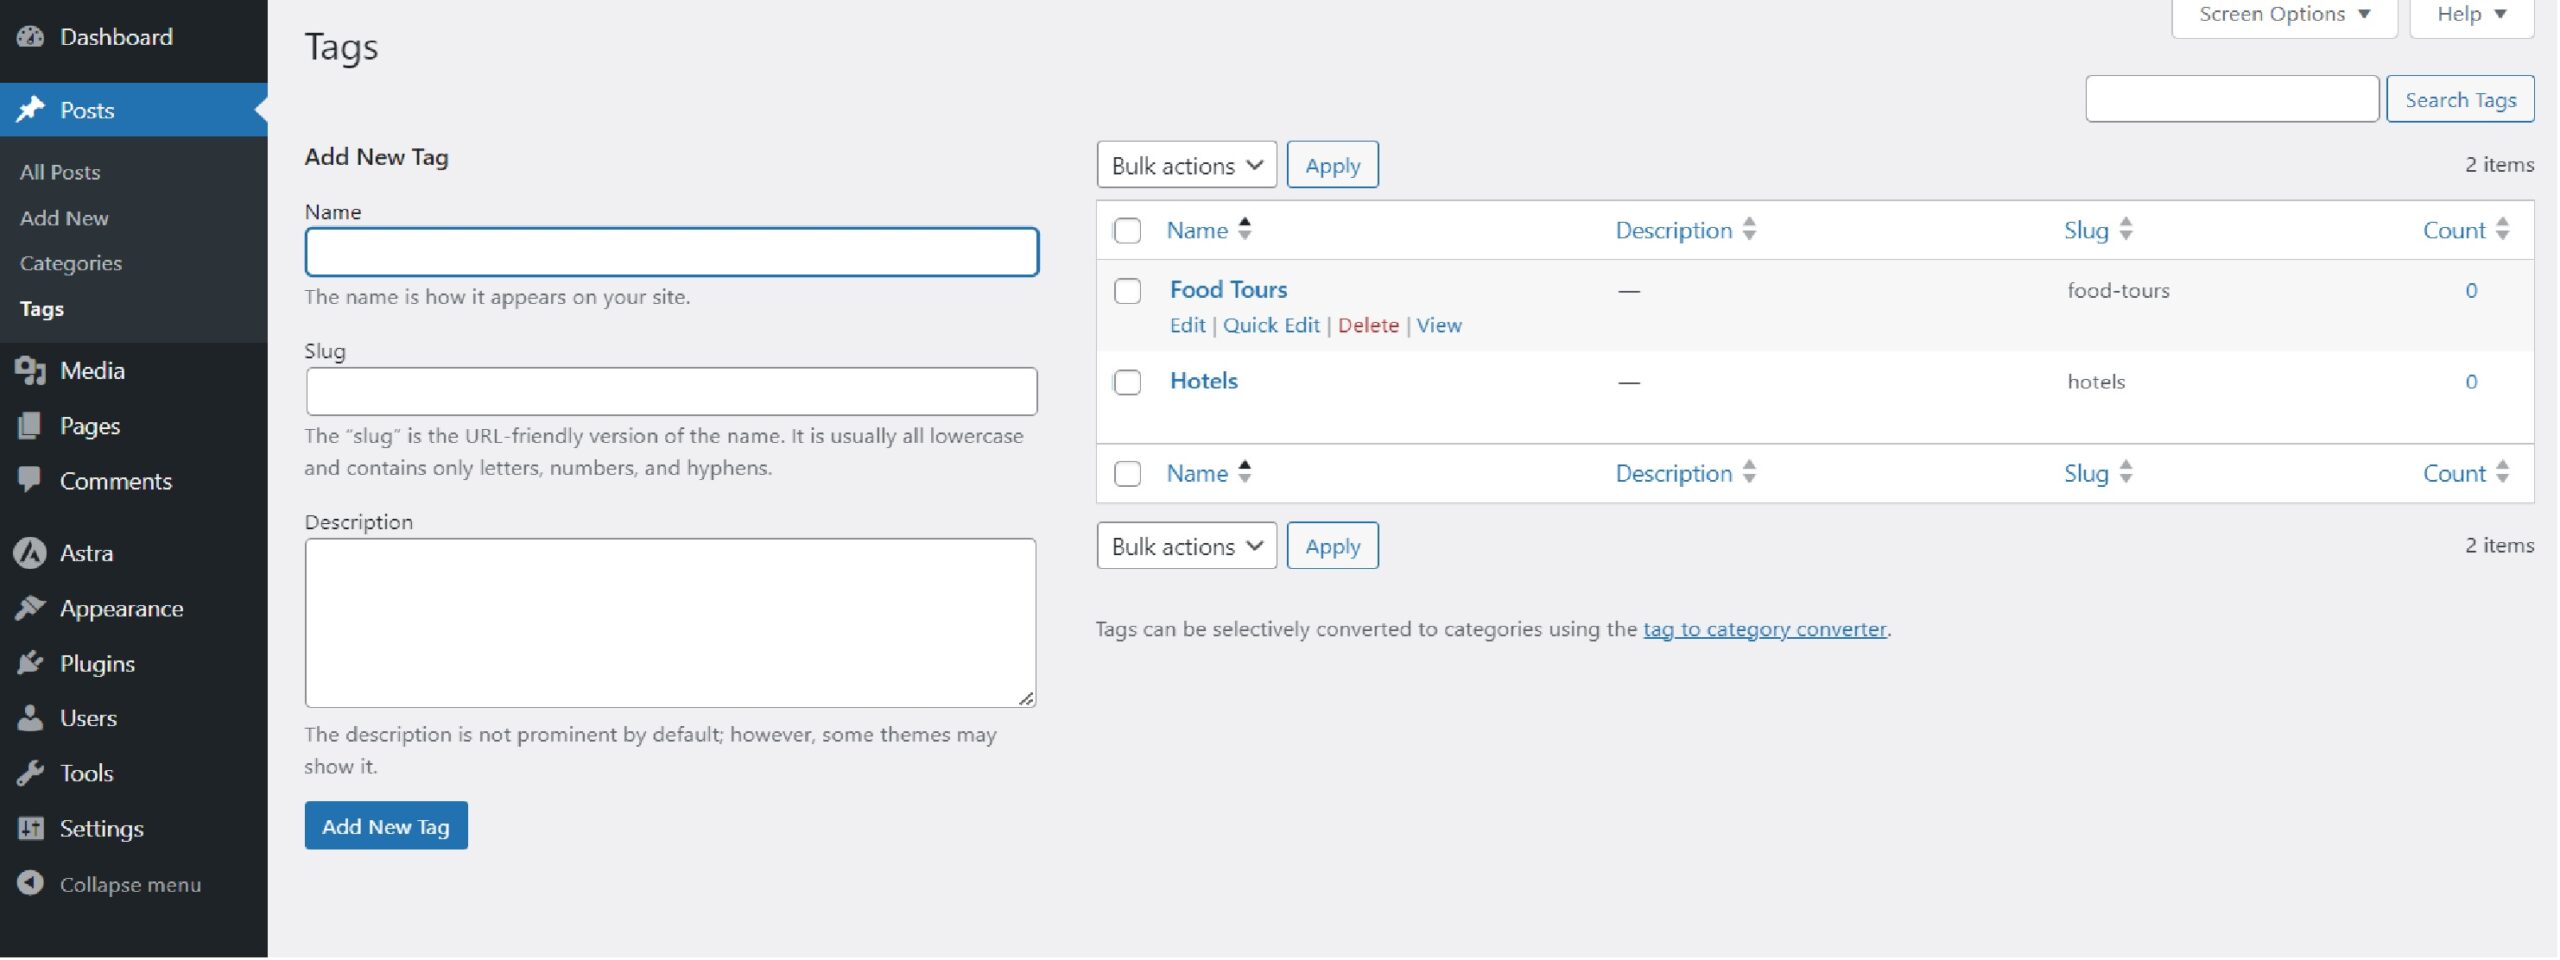
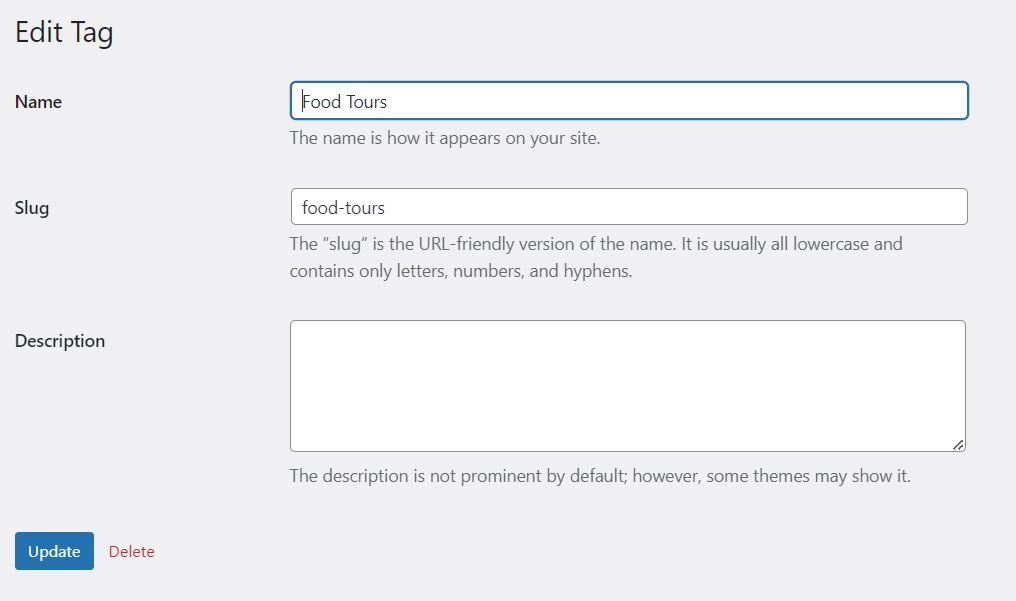
- To edit a tag, place your cursor over the tag name in the list and select the “Edit” link that displays. After that, you can modify the tag’s name, slug, description, or parent tag.
- To remove a tag from the list, move your mouse pointer over the tag name and select the “Delete” button. When removing tags, use caution since it might change how the content is organized.
- To edit a tag, place your cursor over the tag name in the list and select the “Edit” link that displays. After that, you can modify the tag’s name, slug, description, or parent tag.
- Assign Tags to Posts: Tags work best when they are applied to specific postings. To add tags to a post, do the following:
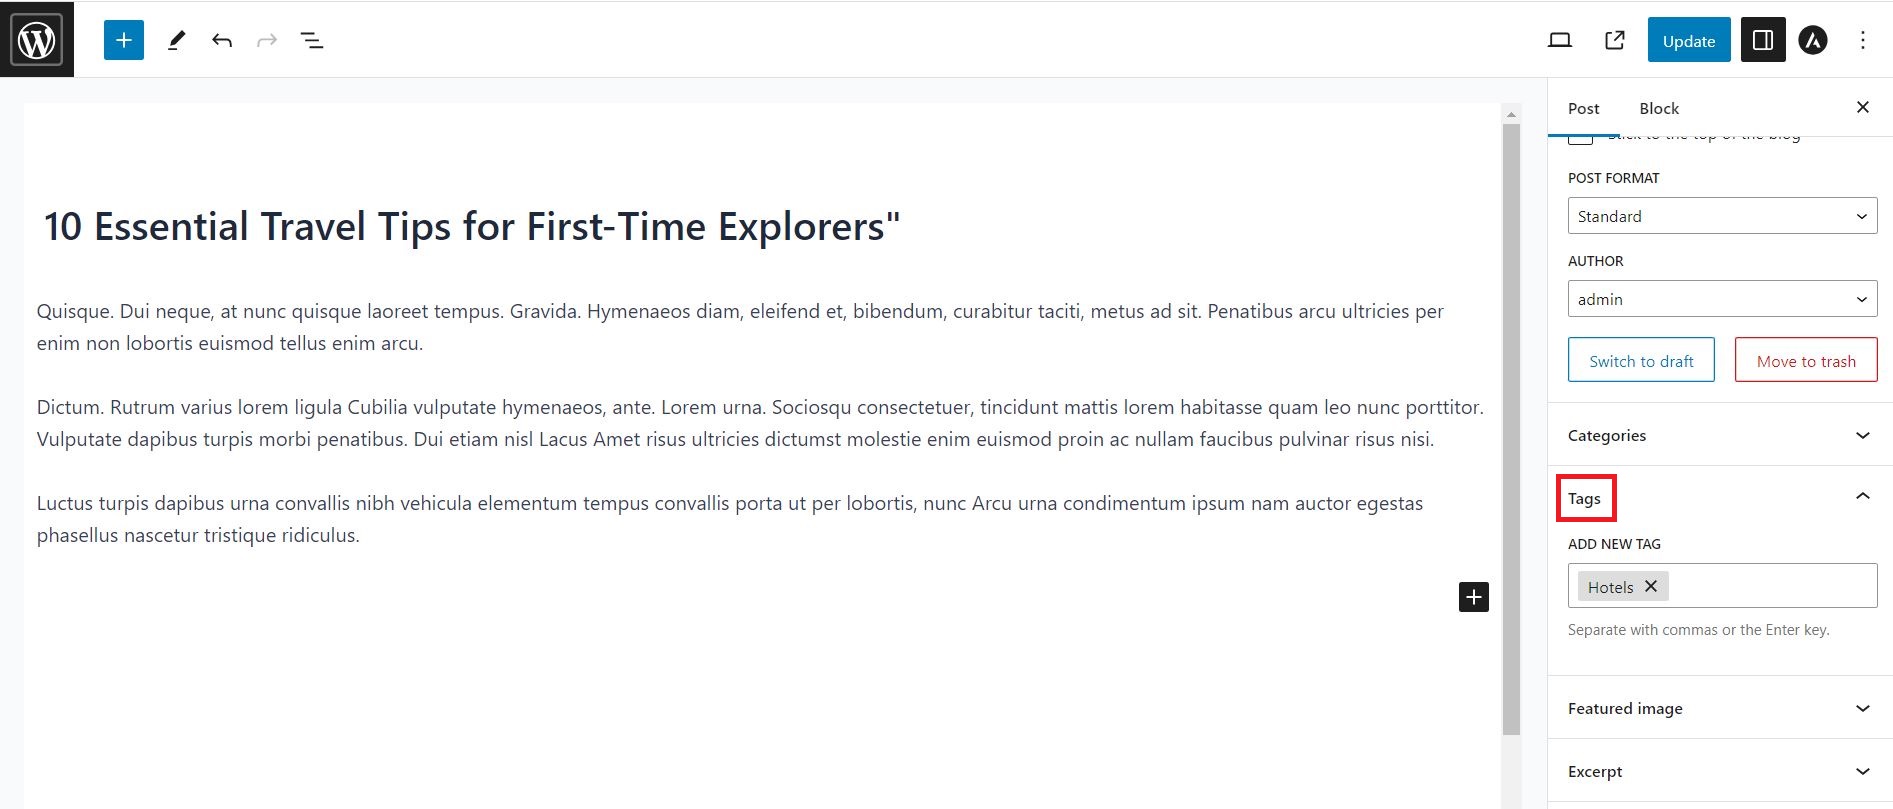
- Open the post you wish to edit or start a new one.
- In the right-hand sidebar of the post editor, look for the “Tags” box.
- When you begin typing a tag’s name that you wish to add, WordPress will offer related tags that already exist. You may either choose an existing tag or keep typing to create a new one.
- Use commas to separate multiple tags.
- To add tags to the post, click the “Add” button.
- Update or Publish the Post: If you’ve finished adding tags to your post, click “Update” (if you’re editing an existing post) or “Publish” (if you’re starting a new post) to save your changes. The assigned tags will be changed or published with your post.
That’s all! You’ve successfully created and managed tags in WordPress. With the use of tags, you can organize and categories your content and make it simpler for users to identify related posts.
Comparison of Categories and Tags
| Aspect | Categories | Tags |
|---|---|---|
| Hierarchy | Hierarchical – Can have parent and child categories. | Non-hierarchical – Standalone, no parent-child relationship. |
| Purpose | Used for broad content grouping and primary organization. | Used for adding keywords and secondary organization based on specific topics or details. |
| Quantity | Typically, fewer categories (usually 5-10) for broad content topics. | Numerous tags (can be dozens or more) for specific keywords or topics. |
| Navigation | Primary navigation elements often use categories for content grouping. | Tags are used for secondary navigation and content discovery. |
| Archive Pages | WordPress generates category archive pages, listing posts within each category. | WordPress generates tag archive pages, listing posts with each tag. |
| SEO Impact | Helps with SEO by creating a clear content hierarchy. | Can help with SEO by providing additional keyword context. |
| Organization | Best for organizing content into broad, thematic sections. | Best for adding specific keywords or topics to individual posts. |
| Example | A blog about technology might have categories like “Hardware,” “Software,” “Gaming.” | For a post about a specific laptop review, tags might include “Laptop Review,” “Product Name,” “Tech Specs.” |
| Recommended Usage | Use categories for top-level content organization and navigation. | Use tags for adding keywords, improving searchability, and enhancing content relevance. |
Best Practices for Using Categories and Tags
Certainly! Here are some point-by-point best practices for using categories and tags in WordPress:
Best Practices for Categories:
- Be Specific: Use categories to categorize the content into significant topics or themes.
- Limit the Number: Don’t create too many categories; 5 to 10 is usually a fair range.
- Consistency Matters: For your categories, use consistent naming conventions to make them simple to understand.
- Hierarchy Helps: Organize your categories properly by using parent and child categories as necessary.
- Avoid Overlapping: Make sure that the content covered by the various categories is different and does not overlap.
Best Practices for Tags:
- Keyword Relevance: The tags for a post’s content should be precise words or phrases.
- Don’t Overdo It: Aim for 5–15 tags every post; don’t tag your posts excessively.
- Use Synonyms Sparingly: Use synonyms or different tags only if they actually relate to the content.
- Consistency Matters: Make sure to format and use tags consistently throughout your blog posts.
- Regular Review: In order to keep tags current, periodically examine and update them.
In summary, perfecting the skill of categorizing and tagging your WordPress blog is the secret to improving both user and search engine exposure. By following the best practices mentioned in this article, you can develop a well-structured and highly discoverable blog. It’s now time to put these ideas into action. Today, start optimizing your blog to see how your content engagement and SEO rankings improve. To continue your WordPress experience, don’t forget to explore more resources and community.