Visual elements are essential in engaging and capturing your audience in the dynamic world of website design and content creation. Visual components on a WordPress site can draw users’ attention, and when combined with well-written text, they can considerably increase content value. Among the various elements that improve the visual appearance of your WordPress website, “Featured Images” stand out as an effective tool for delivering your message, attracting visitors, and improving overall appearance.
The main image attached to a particular post or page on your WordPress website is known as a featured image, also known as a post thumbnail. It acts as a visual representation of the information and stands out when the post is shared on social media or in posts lists on your website.
Currently, you might be thinking, “Why should I bother resizing these featured images?” The answer lies in web design’s perfect balance between form and function. While high-quality photos can enhance your site’s appearance, big or poorly sized images might cause your site to load slowly, disappointing users and perhaps lowering your site’s search engine rankings.
In this article, we’ll examine the details of understanding featured images in WordPress and, more importantly, how to successfully resize them. Whether you’re an experienced WordPress user trying to optimize your website or a beginner just beginning your digital journey, this tutorial will provide you with the knowledge and abilities to improve the appearance and performance of your website through the art of resizing featured images. So, let’s start on this journey together to understand the complexities of WordPress featured images.
Table of Contents
Importance of Featured Images in WordPress
A featured image in WordPress, also known as a post thumbnail, is a representative image connected with a single post or page. It is used in a number of different ways across your WordPress website and serves as the main image for that specific content item. Featured images are a crucial component of WordPress for the following reasons:
- Visual Representation: A featured image is a visual representation of the content that gives users a glimpse of what the post or page is about. It’s frequently the first image users see when they come upon your content on the homepage of your website, in search results, or on social media. A well-chosen featured image can make your content more interesting and memorable.
- Content Highlight: The visual theme or topic of your content is represented via featured images. They give visitors a sneak peek into the content, allowing them to choose whether the content is of interest to them. It improves the visual appeal and professionalism of your posts and websites.
- Search Engine Optimization (SEO): When ranking web sites, search engines like Google consider factors such as the relevance and quality of the images. Featured images that are optimised and appropriate can help your SEO efforts by adding more context and keywords to your content.
- Content Categorization: Featured images can help in categorizing and differentiating content on your website. For example, blog posts can have featured images that represent different categories, making it easier for readers to explore your site.
- Content Structure: Many WordPress themes arrange the layout of your website using featured images. For example, they may use featured images to create grids, carousels, or sliders on the homepage, making your site look more attractive and organised.
- Storytelling : Featured images can be powerful storytelling tools. They may develop the tone, convey emotions, and attract readers into your content’s narrative. For blogs, news websites, and personal websites, this storytelling component can be extremely useful.
In summary, featured images in WordPress are crucial to the success of your website. They serve a functional purpose as well as a decorative one. They are an essential part of your online presence because they have an impact on how search engines understand, share, and rank your content. Therefore, selecting and optimizing featured images should be a thoughtful and planned step in the content creation procedure.
How to add a featured image for a post or page in WordPress
Adding a featured image to a post or page in WordPress is a straightforward process. Here’s a detailed step-by-step guide:
Step 1 : Edit or Create a Post/Page
To add or edit a post or page, locate “Posts” or “Pages” on the left sidebar and click on it.
If you’re updating an existing post or page, find it and click “Edit.” If you want to make a new post or page, click “Add New.”

Step 2: Access the Featured Image Option
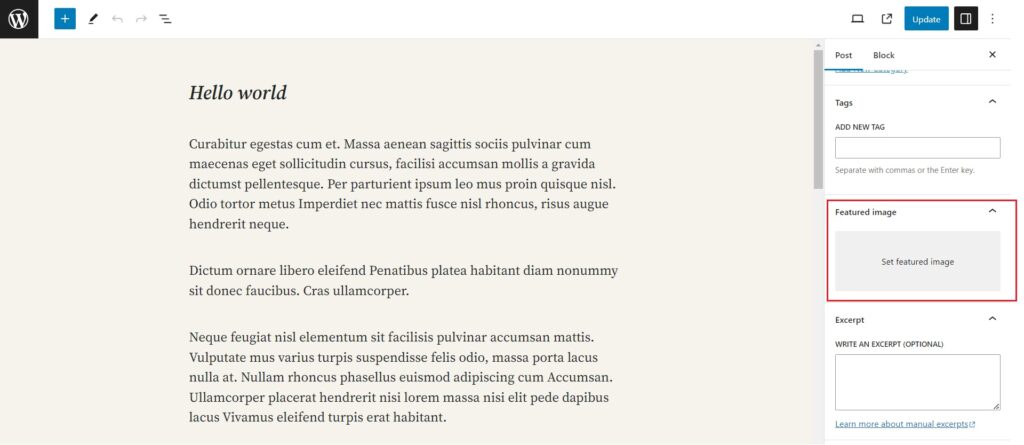
Find the “Featured Image” box in the WordPress post/page editor. According on your WordPress theme and settings, this box’s exact location may differ from where it normally appears on the right side of the editor.

Step 3: Set or Modify the Featured Image
Click the “Set Featured Image” link located in the “Featured Image” box in order to add a new featured image.
Step 4: Upload or Select an Image
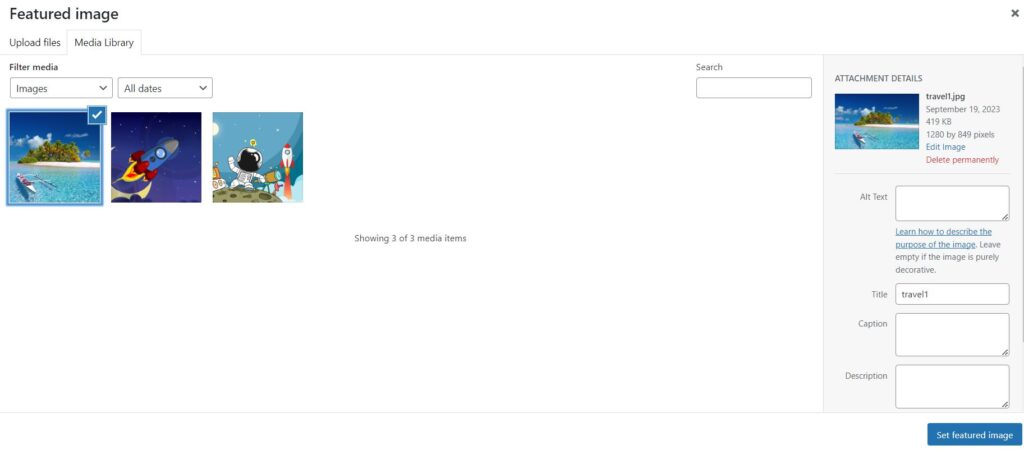
You’ll be directed to the Media Library. You have two options here:
Upload New Image: Click the “Upload Files” option, then “Select Files” to select an image from your computer. Select the image and click “Set Featured Image” once it has uploaded.
Use an Existing Image: To use an image that already exists in your Media Library, simply select it in the list, choose it, and then click the “Set Featured Image” button.

Step 5: Add Image Details
You can add additional information to an image after selecting or uploading it, such as:
Title: A descriptive title for the image.
Alt Text: A brief, helpful explanation of the image for accessibility and SEO purposes.
Caption: An optional caption for the image.
Description: Additional information or context regarding the image.
It’s a good idea to fill out these fields because they support both accessibility and search engine optimization (SEO).
Step 6: Set the Featured Image
After adding or modifying the image details, click the “Set Featured Image” button.
Step 7: Save or Update Your Post/Page
Make sure you’ve updated the post or page with any other necessary changes. Your chosen image has now been set as the featured image for the post or page.

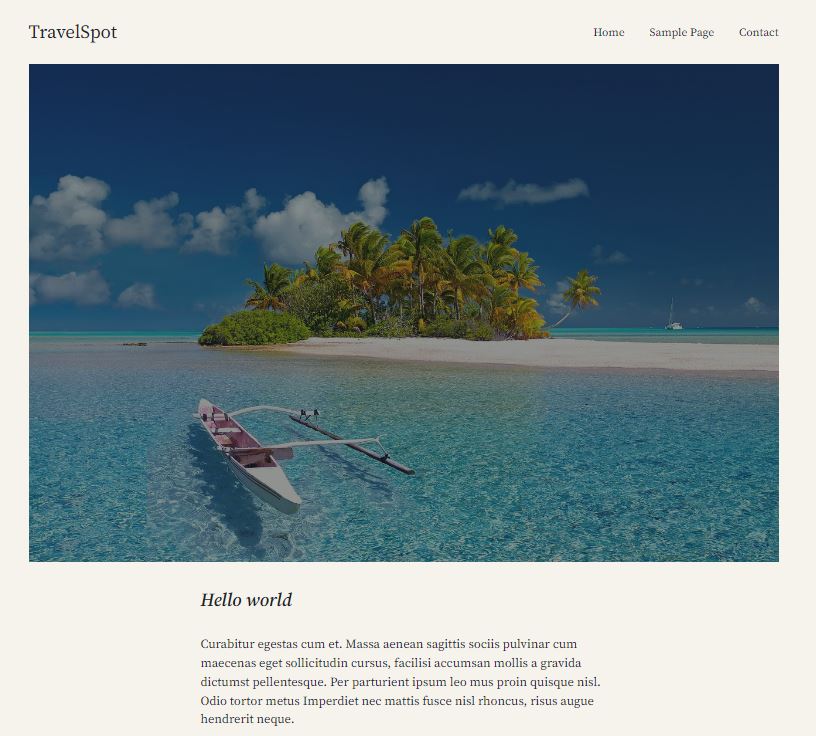
Your featured image is now set for the post or page. It will be displayed according to the design and layout options of your WordPress theme, and it will be visible when users view that specific post or page on your website. To effectively engage your audience, use a relevant and attractive featured image.
Why Resize Featured Images?
Resizing featured images in WordPress is useful for various reasons:
- Page Load Speed and User Experience: Large and unoptimized images can significantly slow down your website’s loading times. Image resizing reduces file size and increases website load speed. Users prefer websites that load fast and smoothly. Resized graphics improve the overall user experience by reducing bounce rates and increasing user engagement.
- Mobile Responsiveness: Many users use mobile devices with various screen sizes and resolutions to visit websites. Resized images work better with various screen resolutions and sizes, ensuring that your website appears excellent and performs effectively on mobile devices.
- Consistent Appearance: Resizing Featured images creates a uniform and consistent look across your website. Your website will appear well-organized and attractive when all of the images are the same size.
- Better SEO: Speed of page loading is a ranking factor for search engines. Better search engine optimization (SEO) and higher search rankings can result from faster-loading pages. Your website will load faster if you resize and optimize images, which will help your SEO efforts.
WordPress Image Sizes
Understanding WordPress image sizes is essential for enhancing the functionality, appearances, and user experience of your website. WordPress gives you the option to change the default image sizes to better meet the requirements of your website. We’ll go through the various image sizes in WordPress in detail below:
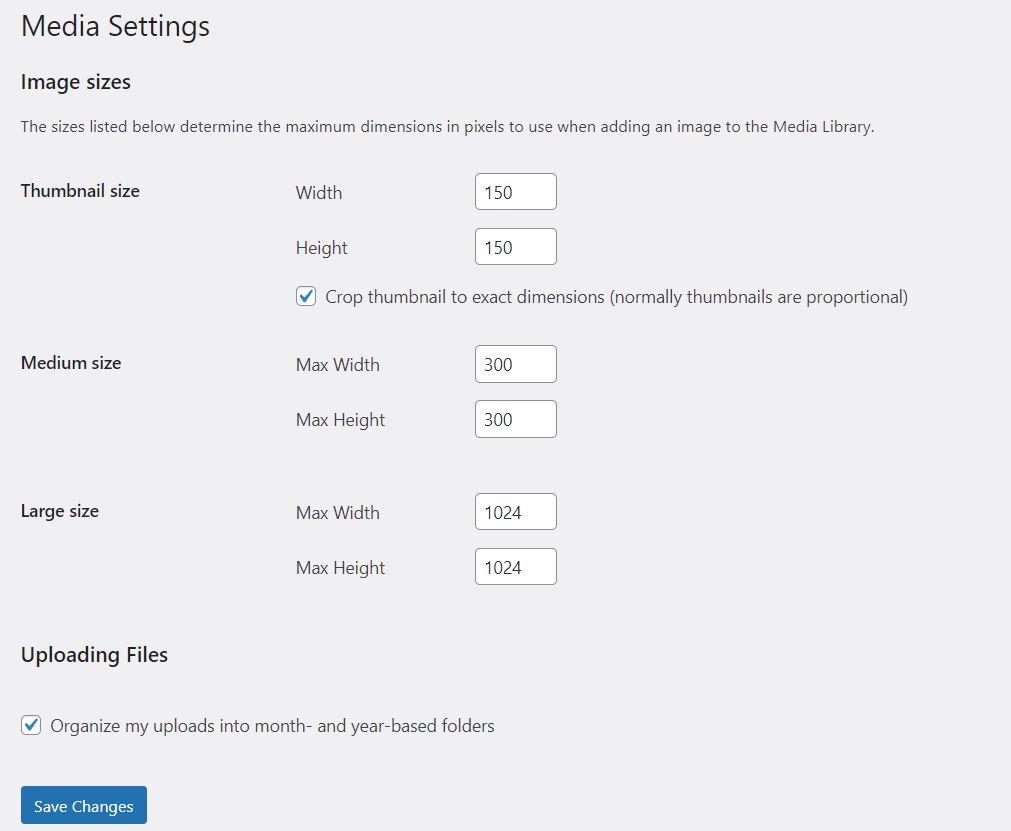
- Thumbnail Size: Thumbnails are set to 150 pixels in width and height by default. Thumbnails are frequently used in widgets, galleries, and as post previews on your site. They are small, square images that show a preview of the content.
- Medium Size: Medium-sized images do not have a default size, and WordPress utilizes the dimensions of the original image.In some themes or in your media library, medium-sized images are used. They are generally used for smaller featured images or content because they are bigger than thumbnails but still quite small.
- Large Size: Large-sized images, like medium-sized images, don’t have default dimensions. WordPress uses the dimensions of the original image. When inserting images into your article, large images are used. They are appropriate as blog post and page images. Large images are displayed at their full width within the content area.
- Full Size: The full-size image maintains its original dimensions. When you link to an image directly or when you insert an image into the content without selecting a size, full-size images are used. Due to potential performance concerns, it is not usually recommended to use full-size images for large-scale display.
- Custom Image Sizes: You or your theme or plugin can provide custom imagine sizes. Custom sizes are frequently used to create unique layouts or to meet specific design requirements. Custom image sizes can be registered for use across your site by plugins and themes.
- Image Compression: Image compression reduces file sizes while preserving acceptable image quality. This is essential for increasing website speed and decreasing server load. You can modify the level of image compression by using plugins or manually compressing images before uploading.
- Aspect Ratios: The proportional relationship between the width and height of an image is referred to as the aspect ratio. Aspect ratios that are frequently used include 4:3, 16:9, and 1:1. By maintaining constant aspect ratios across your website, you can prevent stretched or distorted images and make sure that images display correctly.
Steps to Resize Featured Images in WordPress
Find the “Settings” option in the left-hand menu on the WordPress dashboard. When you move the mouse over “Settings,” a submenu will display. Then select “Media.”
You can define different image sizes, such as thumbnail, medium, large, and full size, once you’re on the Media Settings page. Adjust these options to suit your requirements.

Don’t forget to scroll down and use the “Save Changes” option to put your new settings into effect after adjusting the image sizes to your preference.
Best Practices for Featured Images
Using featured images properly is important for developing engaging and eye-catching content in WordPress.
- Relevance to Content: Choose highlighted images that are directly connected to your content and of excellent quality.They should to give readers a visual overview of the content.
- Size and Dimensions: Make sure your featured images are appropriate size for your WordPress theme. A professional appearance is maintained across your entire website by using the proper dimensions.
- Image Optimization: Optimize your featured images for the web to ensure fast loading times. To reduce file size, compress images without sacrificing quality.
- Alt Text: For your featured images, always provide a description in the alt text. In addition to enhancing SEO, alt text acts as an accessibility feature by assisting viewers who are visually impaired in understanding the content in the image.
- Mobile Responsiveness: Make sure that featured images appear correctly on a variety of devices, such as smartphones and tablets. Responsive design improves the user experience.
- Originality and Uniqueness: Use original or unique images whenever possible. This differentiates your content and gives a personal touch to your website.
By following these best practices, you can make the most of featured images in WordPress, improving the visual appeal, accessibility, and overall effect of your content on your website.
