In Unity, GameObjects and Components are the building blocks for creating interactive and dynamic virtual worlds. In this blog post, we’ll explore the concepts of GameObjects and Components in detail, along with code examples.
Table of Contents
GameObjects: The Foundation of Your Scene
In Unity, a GameObject is a fundamental building block that represents any object within a game scene. It’s the primary container for Components, which are the functional elements that give the GameObject its behavior, appearance, and interactions. They represent all of the objects in the game world, from characters to props and beyond. A GameObject is a type of object that can contain children, components, and properties. It acts as the game’s painting canvas. Unity scenes are built on GameObjects, which allow developers to create complex interactions and thrilling experiences.
What is GameObject?
A GameObject is similar to an empty container that can hold different Components, each responsible for a specific aspect of the object’s functionality. It is the basic building block of your game scene and can represent characters, props, cameras, lights, and more.
GameObjects as Placeholders for Entities
GameObjects, the central component of Unity’s game engine, act as placeholders for a wide variety of entities that make up your game scenes:
- Characters: GameObjects can represent players, NPCs, enemies, or any character within the game.
- Objects: GameObjects include all scene elements, including items, collectibles, and interactive elements.
- Environment: GameObjects can contain buildings, terrain, and props, making scene creation simple.
- UI Elements: Even UI elements such as buttons, panels, and text are GameObjects, ensuring seamless integration.
Hierarchical structure of GameObjects
The hierarchical structure formed by GameObjects in Unity is the backbone of scene organization and interaction. It enables you to build complex scenes by arranging GameObjects into parent-child relationships. Child GameObjects are connected to their parent GameObjects, creating a parent-child relationship. It enables you to build complex scenes by arranging GameObjects into parent-child relationships. This structure offers an efficient way to manage interactions and transformations inside your game environment in addition to helping in managing and composition of scenes.
Creating a Hierarchy:
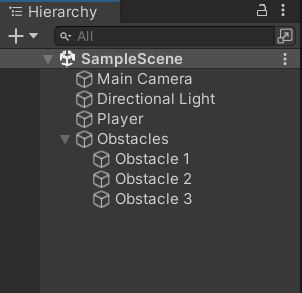
To create a hierarchy, you can simply drag and drop GameObjects within the Hierarchy panel in the Unity Editor. Here’s an example:
Imagine you’re building a simple game with a player character and some obstacles. You might create a hierarchy like this:
- Scene
- Player
- Obstacles
- Obstacle 1
- Obstacle 2
- ….

In this hierarchy, “Player” is a top-level GameObject, and “Obstacles” is its child. “Obstacle 1,” “Obstacle 2,” and so on are children of the “Obstacles” GameObject. This structure makes it easy to manage the player’s character and the obstacles as cohesive units.
Inheritance in the Hierarchy:
Remember that child GameObjects inherit transformations from their parent GameObjects. If you move, rotate, or scale a parent GameObject, its children will be affected accordingly. This behavior simplifies positioning and allows you to create complex motions and animations.
Components: Enhancing GameObject Functionality
Components are the gears that make GameObjects come to life. Transform (position, rotation, and scale), Renderer (visual appearance), Collider (collision detection), and Rigidbody (physics simulation) are examples of common components. Components are the fundamental Unity building blocks that give GameObjects their functionality, behavior, and appearance. Multiple components may be attached to a game object, and these components collectively define how the game object behaves, interacts with other game objects, and responds to player input. Components are like puzzle pieces that, when combined, create a complete and interactive gameplay experience.
Components as Scripts
Unity provides various built-in components, and you can also create your own custom components by extending the MonoBehaviour class. MonoBehaviour is a base class that Unity provides for creating scripts that can be attached to GameObjects. These scripts contain code that defines how a GameObject behaves, interacts, and responds to various events and inputs. A Component script is like a set of instructions that guide the GameObject’s behavior based on the rules defined in the script. Components can be added to a GameObject in the Unity Editor or programmatically through scripts. You can also modify and access the properties of components through the Inspector window in the Editor or through code.
For example, if you want a character to jump when the player presses a button, you would attach a script Component to that character GameObject. The script would contain the logic for detecting the player’s input and applying a jump force to the character’s Rigidbody Component.
Components as Data
Components also hold data that stores information about GameObject properties, settings, and states. The behaviour specified by the script component is supplemented by this data. Component data can be directly exposed to the Unity Inspector, allowing you to visually modify and configure GameObject properties.
For instance, a Collider Component not only defines the shape of a GameObject’s collision boundary but also holds data like whether the Collider is a trigger (doesn’t cause physical collisions) or whether it’s enabled or disabled.
Extending GameObject Behavior
When a component is attached to a GameObject, it extends the GameObject’s capabilities beyond its default behavior. GameObjects themselves have basic properties such as position, rotation, and scale. Components add specific functionality that determines how GameObjects interact with the environment, other GameObjects, and the player.
For example, attaching a script Component to a character GameObject can give it abilities like movement, attacking, and responding to events. Similarly, attaching a Collider Component can enable GameObjects to interact with other GameObjects through collisions.
Commonly Used Components in Unity
Components play an important role in extending the functionality of GameObjects, turning them into dynamic and interactive entities. To build dynamic and interactive game objects, Unity offers a variety of Components.
1. Transform Component
The Transform Component is the foundation of all GameObjects in Unity. It defines the position, rotation, and scale of a GameObject in the 3D world. The Transform Component can be used to directly change the position, rotation, and scale of the GameObject. The Transform component is required for a variety of tasks, including positioning objects in a scene, producing animations, and organizing the hierarchy of the scene.
Components of the Transform:
The Transform Component has three primary properties:
- Position: The world coordinates of the GameObject’s origin point.
- Rotation: The orientation of the GameObject in terms of angles.
- Scale: The dimensions of the GameObject, affecting its size in each axis.
Example
Let’s create a simple example to demonstrate how to move a GameObject using the Transform Component:
- Create a new Unity scene and create a GameObject (e.g., a Cube) in the scene.
- Create a new C# script named “MoveObject” and attach it to the Cube GameObject.
- In the script, write code to move the GameObject using the Transform Component.
- Play the scene. You can move the GameObject forward and backward using the W and S keys.
using UnityEngine;

public class MoveObject : MonoBehaviour
{
    public float moveSpeed = 5f;

    private void Update()
    {
        // Move the object forward based on input and speed
        float moveAmount = Input.GetAxis("Vertical") * moveSpeed * Time.deltaTime;
        transform.Translate(Vector3.forward * moveAmount);
    }
}
Result
- The
moveSpeedvariable determines how fast the GameObject moves. - In the
Updatemethod, we useInput.GetAxis("Vertical")to get the vertical input from the player (W and S keys). - We calculate the amount to move based on the input and speed.
- The
transform.Translate(Vector3.forward * moveAmount)line moves the GameObject along its forward direction.
2. Renderer Component
The Renderer Component controls the visual appearance of a GameObject by rendering its graphics and materials. It handles the rendering of materials, textures, and shaders onto the GameObject’s geometry, making it visible to players in the game world. The Renderer is frequently used along with with materials and shaders to define the GameObject’s final look.
Example
Here’s an example of how to change the colour of a GameObject’s Renderer component.
using UnityEngine;

public class ColorChangeExample : MonoBehaviour
{
    private Renderer objectRenderer;

    private void Start()
    {
        // Get the Renderer component attached to the GameObject
        objectRenderer = GetComponent<Renderer>();

        // Change the color of the material to red
        objectRenderer.material.color = Color.red;
    }
}
In this case, the script changes the GameObject’s Renderer component’s color to red. This effect is created by accessing the Renderer component’s material property and changing its color property.
3. Collider Component
In Unity, the Collider Component is essential for providing collision detection and interaction between GameObjects in your game world. For the purpose of detecting collisions with other objects, Collider Components specify the physical shape of GameObjects. Colliders are used to enable interactions like player-environment collisions, object physics, triggers, and more.
Types of Colliders:
There are several types of colliders available in Unity, each suited for different shapes and scenarios.
- Box Collider: Represents a rectangular 3D volume.
- Sphere Collider: Represents a spherical volume.
- Capsule Collider: Represents a cylindrical volume with rounded ends.
- Mesh Collider: Uses the object’s mesh shape as the collision boundary.
- Terrain Collider: Automatically generates collision based on the terrain’s heightmap.
- Character Controller: Specifically designed for character movement.
Example
Consider that your scene has a wall and a player character. You want the player to collide with the wall and stop when they hit it.
- Attach a Box Collider to the wall GameObject as well as the player character GameObject.
- Make sure “Is Kinematic” on the wall is not checked, allowing collisions to effect the rigidbody component (if applicable).
- If you want the player to react to the collision, you might use the OnCollisionEnter event in a script attached to the player GameObject.
using UnityEngine;

public class PlayerController : MonoBehaviour
{
    private void OnCollisionEnter(Collision collision)
    {
        if (collision.gameObject.CompareTag("Wall"))
        {
            Debug.Log("Player hit the wall!");
            // Add code to stop or react to collision.
        }
    }
}
When player collide with wall during gameplay, you’ll see a message in the Unity Console.
4. Rigidbody Component
The Rigidbody component in Unity is a physics component that simulates realistic physics behavior for GameObjects. It enables GameObjects to respond to external forces like gravity, apply forces to move or rotate, and interact with other GameObjects using physics simulations.
Properties and Features of Rigidbody:
- Mass: Determines how heavy the object is and influences its response to forces.
- Drag: Simulates air resistance, slowing down the object’s movement.
- Angular Drag: Controls how much the object’s rotation is slowed down.
- Use Gravity: Enables or disables the effect of global gravity on the object.
- Is Kinematic: When set to true, the object’s position is controlled externally (useful for animations).
- AddForce(): Applies a force to the object, causing it to move.
- AddTorque(): Applies torque to the object, causing it to rotate.
Example
Let’s create a simple example where a GameObject with a Rigidbody component responds to player input to move around.
- Create a new GameObject in your scene. You can simply add a 3D Cube from the “GameObject” menu.
- Select the GameObject, go to the “Add Component” button in the Inspector, and search for “Rigidbody.” Add the Rigidbody component.
- Create a new C# script called “PlayerController” and attach it to the GameObject using the Rigidbody component.
- Write code to move the GameObject based on player input in the “PlayerController” script.
using UnityEngine;

public class PlayerController : MonoBehaviour
{
    public float moveSpeed = 5f;
    private Rigidbody rb;

    private void Start()
    {
        rb = GetComponent<Rigidbody>();
    }

    private void Update()
    {
        float horizontalInput = Input.GetAxis("Horizontal");
        float verticalInput = Input.GetAxis("Vertical");

        Vector3 movement = new Vector3(horizontalInput, 0f, verticalInput);
        rb.AddForce(movement * moveSpeed);
    }
}
When you play the scene, you’ll see that the GameObject moves in response to the arrow keys or WASD because of the force that the Rigidbody component is applying.
The foundation of Unity game development is an understanding of GameObjects and Components. You’ve taken a significant step towards becoming a proficient Unity developer by learning these concepts.
